Creating a Jar File
Once you have successfully completed your programming assignment, you will need to create a Jar file to submit your assignment.
This will help us grade your assignment. You will lose points if you do not submit your programming assignments in a Jar file.
Instructions for checking your Jar file
What is a Jar File?
Jar stands for "Java Archive". It's much like a compressed ZIP file that you may have used before. You'll be adding each Java
source file in your assignment (usually only one file) to a Jar file before submitting. The size of the final Jar file will
be smaller than the original programs and therefore be easier to submit.
How Do I Create a Jar File?
- After you've successfully compiled, run, tested, and commented your program,
choose New...Standard Project from the Project menu in jGRASP.

- You will then be asked to name your project and give a location to store it.
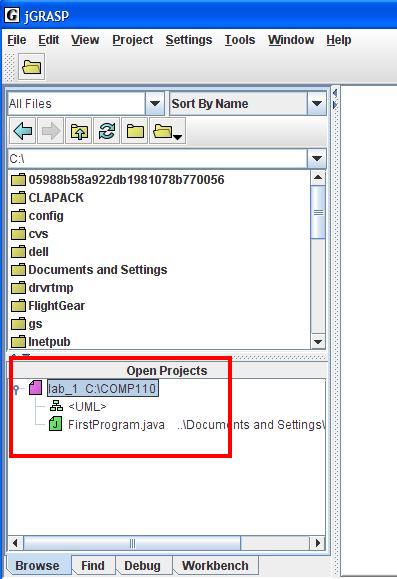
- After creating a project, you will be offered the opportunity to add java files to it.
Add any java files that are part of the assignment and then click Close. The files you added should now appear as part
of the project in jGRASP as shown in the Figure.

- After you've successfully compiled, run, tested, and commented your program, choose Create Jar File For Project...
from the Project menu in jGRASP.

- The Create Jar File for Project (default) window should open. Select the checkbox marked 'sources.' The java files
you need to submit for the assignment should now be listed in window.
Make sure the Java source files (ending in .java) are included.

- If you need to add additional java files for some reason, click Add and choose the files you wish to include.
- Once all the java files you need to submit are included, click Next.
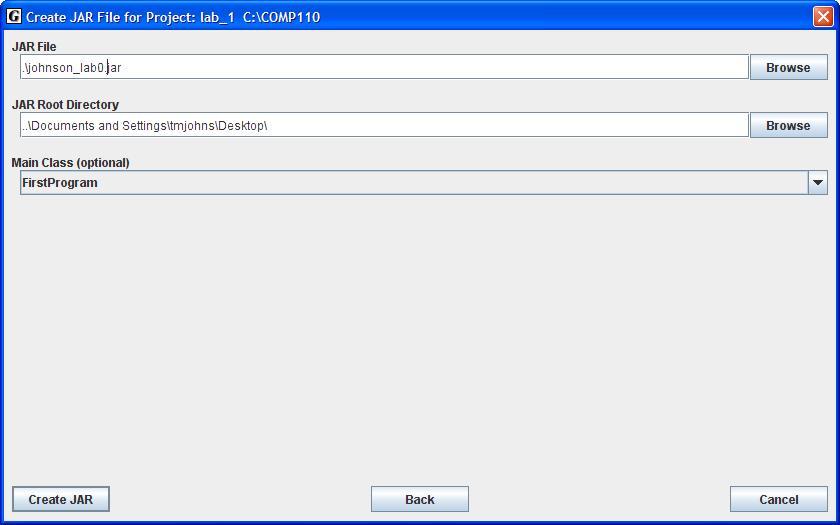
- A new window will open asking for the name of the Jar file to create. You should name the file
lastname_lab#.jar or lastname_pro#.jar depending on the type of assignment.
Make sure that the Jar file ends in .jar and that the file is being created in the same folder as your Java
source files. Once you have appropriately named your Jar file, click Create Jar.

- Your Jar file should now be created.
How Do I Check to Make Sure My Jar File is Correct?
- After you've completed the steps above, your Jar file should appear in the list of files on the left side of your jGRASP
window.
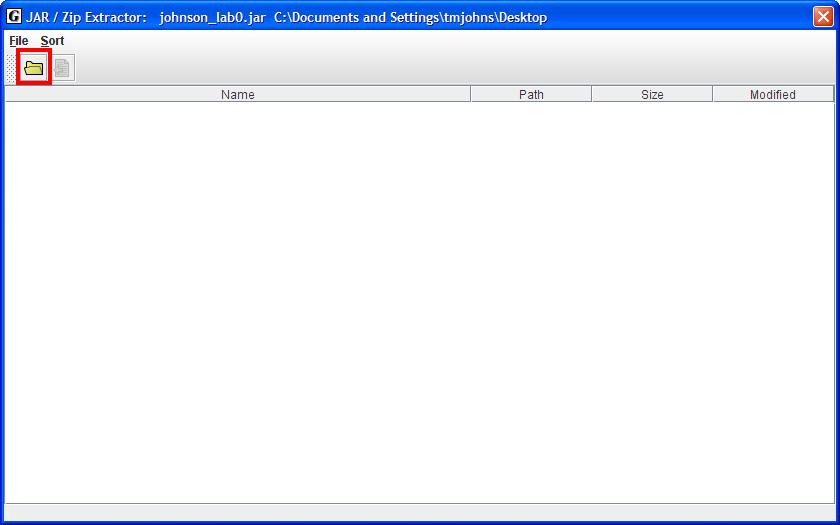
- Choose Jar/Zip Extractor... from the Project menu.
- In the Jar/Zip Extractor window, click on the folder icon.

- In the Open File window, chose the Jar file that you just created and click Open.

- If you see the name of your Java source file(s) in the Jar/Zip Extractor window, you have successfully
created your Jar file. (You may also see some other files, like "META-INF" and "MANIFEST.MF" in the window.)
- When you submit your assignment, you only need to attach the Jar file.